

How To Draw A Sea Horse
How to describe a seahorse with an awesome body pattern
Learn how to draw a seahorse. A footstep past stride tutorial to depict an awesome looking seahorse including easy to follow steps to draw the tricky body pattern!

Today we will learn how to draw a seahorse. Apart from that cheeky eye and a friendly small smile, this is a pretty realistic-looking seahorse. The trick to drawing an awesome looking seahorse is drawing out that rigid spiky pattern on the seahorse's body. We volition prove you an piece of cake mode to depict information technology, step by footstep - although some patience is required to draw the many little spikes!
pencil
,
eraser
,
colour pencils
drawing newspaper
or
sketch book
Love drawing? Never miss a tutorial!
How to depict a seahorse: sketching step by stride
Stride 1 : Sketch the head and spine

Permit'southward start our seahorse drawing with the usual simple sketch. Draw a pocket-sized oval - this volition be the base shape for the head. Then draw an "S" curved line from the oval, kind of a question mark. Now we have a lively if a bit leaning seedling right there.
Footstep ii : Sketch the belly and the tail
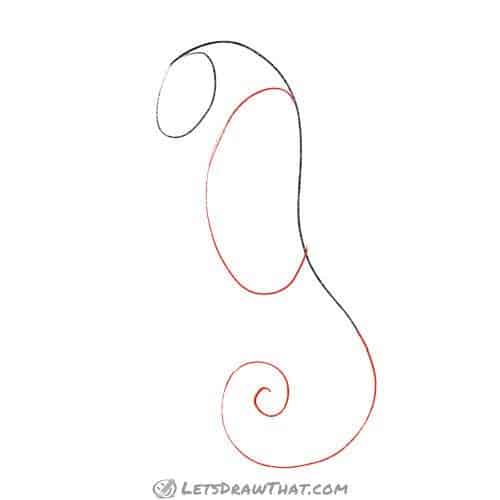
Allow's go along building the seahorse's body. Add a "C" curved abdomen. Notice where we take placed it - with the previous line it makes a nice bean shape. Then extend the spine line down with a nice curved spiral - this will exist the seahorse's tail. If the spiral is too hard for you, just draw any curved line. Seahorses expand and curl their tails to swim - and then whatsoever shape is acceptably correct.
Step iii : Sketch the rest of the trunk
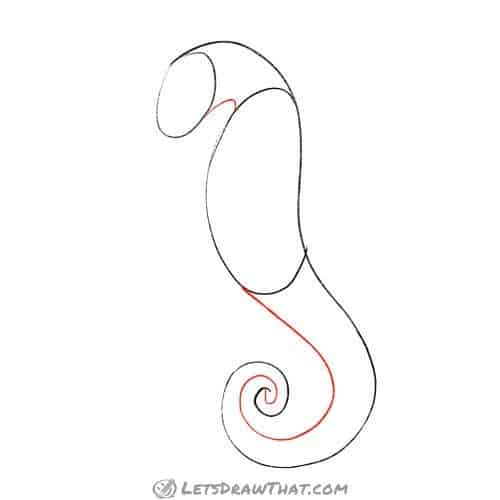
Complete the body with a brusque bend at the top to close the cervix, joining the head to the abdomen. So depict the front line for the spiral tail - notice how the tail is getting gradually narrower.
Step 4 : Sketch the snout and fin

Side by side, draw the seahorse's nose and snout. Draw a small oval a short distance from the head, and join it to the head oval with 2 almost-straight lines. There are many different types of seahorses, some with short noses, some with extremely long and narrow ones - and so feel complimentary to draw the nose any length y'all like. Add a little dot to mark the eye - that will exercise for at present. Finally, add together a small dorsal fin to the lower back of the body - this is a short curve out with two straight sides closing in. (Do you lot retrieve from our frog tutorial what the convex isosceles trapezoid is? If you exercise, describe that shape, just with curved sides.)
Step five : Mark vertical pattern lines on the body
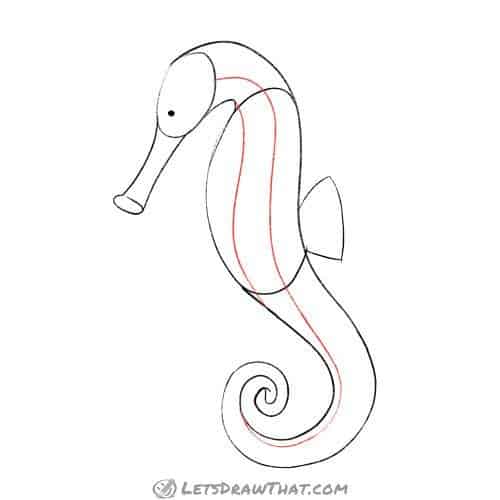
At present if you are afterward an easy seahorse drawing, yous can finish sketching here, and simply outline the seahorse with some bumpy lines. Just hither we continue sketching the grid that will help us draw the awesome texture of the seahorse's rigid grid body. Lightly sketch two curves that follow the shape of the torso and split the body width roughly into thirds. The shorter line starts at the cervix and finishes at the belly bottom. The longer line starts in the eye of the caput (recollect spine), curves through the body and then follows the tail spiral at a close distance from the front line. Exercise not worry too much about these lines being perfect - they are just guides that we will describe over with some seriously bumpy lines and erase at the terminate.
Step 6 : Sketch the horizontal pattern lines on the body

Our next pace is to add the cross-lines along the length of the body. Depict all of the lines so that they are slightly bent up and extended beyond the seahorse's spine - we will use the extra length to draw the spikes. Start the beginning line just behind the eye, and then describe as many as you like across the body. Notice the pattern once more - lines are further apart at the top, on the broad parts of the seahorse's body, and go closer together along the tail equally it thins out.
Footstep 7 : Add round spine ends
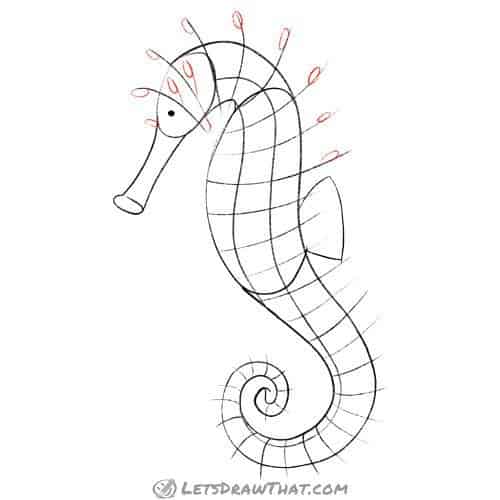
This is the terminal comeback on the blueprint grid for our seahorse. Add together two more curt lines from the middle of the ii showtime cantankerous-lines. And then draw small ovals at the end of the spikes on the head and upper back. Terminate higher up the dorsal fin. Add one actress little oval at the kickoff of the nose, and one nether the mentum.

How to depict a mermaid: step by stride
Larn how to draw a mermaid. An piece of cake footstep by step tutorial to draw a beautiful cartoon style mermaid with long flowing hair basking on a seashell.
How to draw a seahorse: outline drawing step by step
Footstep 1: Start outlining the head

At present nosotros volition employ that sketched grid to draw an awesome pattern outline for our seahorse. We are starting slow, then y'all tin can go the hang on cartoon the convoluted squiggly line following the sketch. The first outline starts behind the centre. Draw a line upward and around the offset piddling oval and come back to form a nice, rounded-off spike. Then continue going around the oval on the meridian for another spike, and down along the face up and to the small spike on the nose. End the line by outlining the top of the nose. Information technology is a mouthful to describe, just the line is adequately simple - three spikes are washed.
Step two: Outline the residue of the head

Using the aforementioned technique, outline the next two of the rounded caput spikes. Then draw the snout - notice the lilliputian bend-in for the oral cavity. Complete the caput outline by drawing the mentum with another bump and finish the line with a curve half-way up along the head oval.
Footstep 3: Depict the rounded back spikes

Past now you should exist proficient in outlining those rounded spikes - so draw a single squiggly line for the back, coming out, around and back for each of those small spikes with ovals.
Pace 4: Draw the lower back spikes
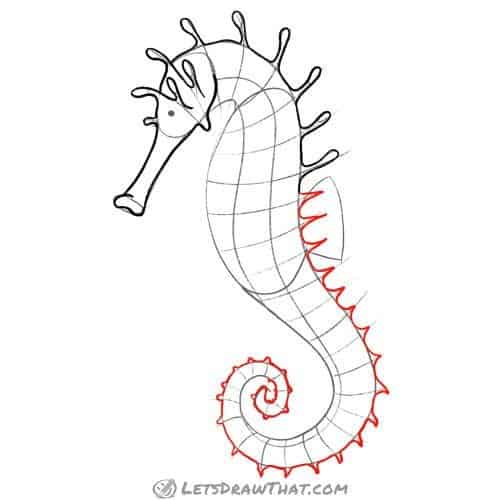
Here is a change of blueprint for you. From the lower dorsum all the way to the tip of the tail, nosotros will draw abrupt spikes, rather than rounded ones, all along the outer back outline. Notice how we are starting with large sharp spikes at the back and how the spikes are getting smaller as the tail narrows, turning into but small-scale bumps at the tip of the tail.
Footstep v: Describe the inner outline

Adjacent, outline the neck, joining it to follow the 2nd line from the left going down over the torso to the inner tail spiral outline. Whenever you cross the vertical grid line, add a piddling fasten, or a small bump onto the outline.
Stride 6: Draw the remaining ii ridge lines
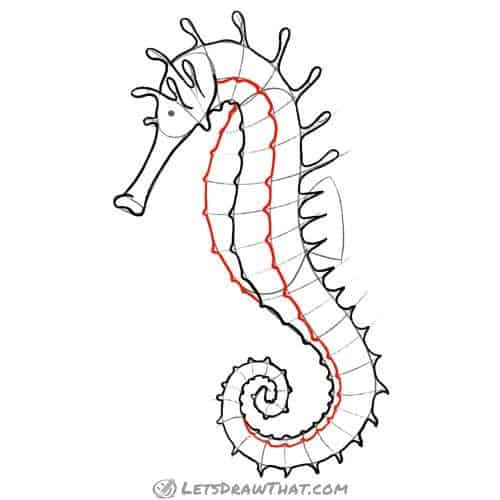
Well, you lot know the drill by now: outline the remaining two ridgelines - the belly and the long mid-torso one. And once more, add together a small-scale fasten or a crash-land whenever you cantankerous the grid-line.
Step 7: Draw the horizontal ridges on the belly

With all the vertical lines drawn, it is time to depict the horizontal splits on the seahorse'southward body. Start with the front end two columns on the body. There the ridges are just short curves. Practise not join them to the vertical lines completely, the pattern will look better if you leave a small gap on each side of the short cross-line.
Footstep 8: Draw the horizontal ridges on the body

Horizontal cross-lines for the spine part are similar, with a piddling up-plow on the right, at the spine end. This looks better, every bit it suggests the spine line in between the fasten gaps. And again, do non join the short cantankerous-lines completely to the vertical lines, leave a minor gap in betwixt. That is information technology, the hard work is washed!
Step nine: Add the details to complete the seahorse
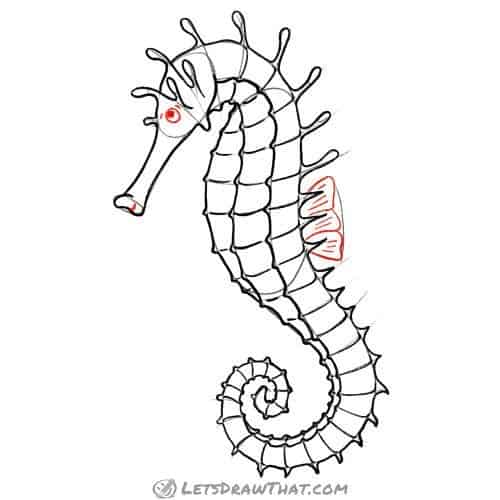
Allow'due south draw the terminal details. Describe the dot for the centre'southward educatee a impact larger and add a small circle around information technology to finish the eye. Then describe the dorsal fin - build information technology from iii overlapping, rounded triangles, and add a few directly lines to mark the fin folds.
How to describe a seahorse: finished drawing
How to draw a seahorse: finished outline drawing

Here is the usual clean outline, after erasing the sketch lines. Congratulations, if yous have fabricated information technology this far, you have learned how to draw a seahorse! And a pretty skillful looking one, for that fact.
How to draw a seahorse: finished drawing coloured-in

The usual concluding step in this how to draw a seahorse tutorial is to colour in the pic. Similar to having many dissimilar shapes, seahorses come in many different colours. Here we have chosen a squeamish gilded yellowish for the body, with some lite yellow for the fin and darker orange for shading. Finally, that green bit of grass is there just to add together some extra colour and dissimilarity to the warm yellow.
Like this tutorial? Share information technology with others:
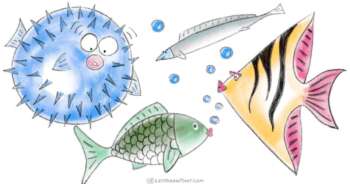
How to draw a fish using simple shapes
Learn how to draw a fish using but uncomplicated shapes - arcs, triangles and circles. Permit's have some fun drawing a carp, mackerel, angelfish and puffer fish!
Dear cartoon? Never miss a tutorial!
Become notified when at that place is a new tutorial published on Let's Draw That! (2-4 times a month)
Check out the latest tutorials:
Similar this? Share the fun with others:


Source: https://letsdrawthat.com/how-to-draw-a-seahorse/
Posted by: sandovalventing.blogspot.com
0 Response to "How To Draw A Sea Horse"
Post a Comment