

how to curve words in google drawings
And so, I was working on a presentation recently for a client and I was asked to bend text into a circle in a Google Slides presentation! I institute it difficult at commencement, but with a little research, I managed to do it quite hands! Here'south what I learned.
Calculation a curve text into a circle directly in Google Slides is currently not possible with the existing in-congenital features. However, yous can add bend text on Google Slides using PowerPoint or other online tools with just a few uncomplicated steps.
In the residuum of the article, I'll assistance you understand how you can add curve text in Google Slides in a pace-by-stride method. Then, allow's get to learn more most it!
A Quick Notation Before We Begin – If you desire to make your presentations stand out, I highly recommend using Presentation Templates from Envato. With Envato, you get access to thousands of presentation designs with unlimited downloads so you never run out of options again. Not merely is Envato Elements very affordable, but also the best in the business organisation when it comes to templates!
Add together Bend Text in Google Slides using PowerPoint
Okay, so the start method is pretty straight-forward. This uses the powerful functionality of Microsoft PowerPoint to create the curved text offset, and then transfer it over to Google Slides.
How to Bend Text in PowerPoint? (Stride-past-Footstep Guide)
PowerPoint, thankfully, has this awesome in-built feature that allows us to curve the text (along with a few other things).
Here's how nosotros can curve text in PowerPoint –
Footstep 1 – Add the Text that you want to Bend

Open a blank PowerPoint File. Add a text box by first clicking on the "Insert" tab, and then on "Text Box" push button. Next, drag and create a text box.
Once yous take the text box on the slide, blazon in the text that you desire curved in to a circumvolve as indicated in the higher up paradigm.
Step 2 – Transform Text to Circle
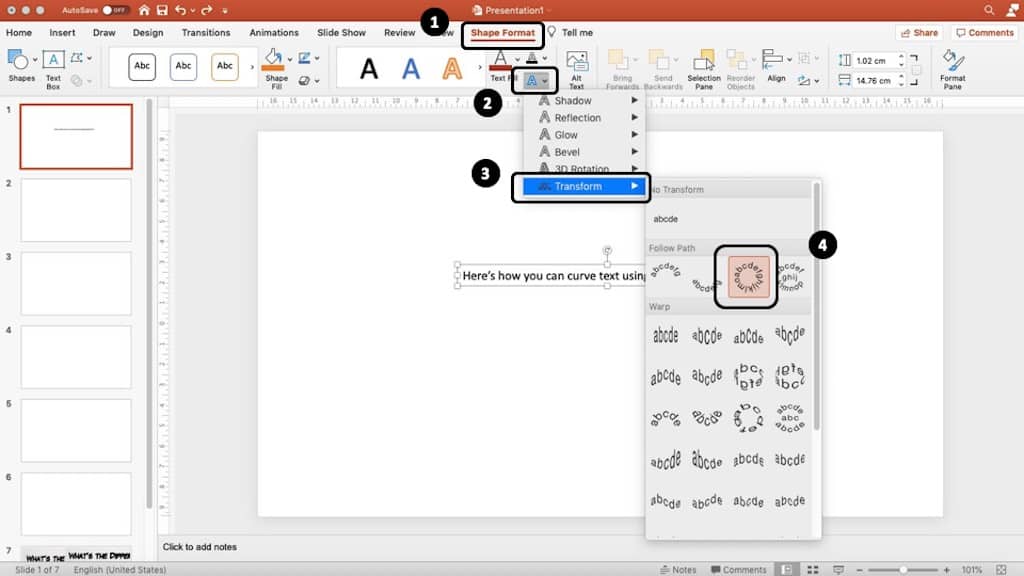
Once yous have added the desired text, click on the text box and then on "Shape Format" (or "Format" in older versions of PowerPoint). Brand certain that you have highlighted the text.
Next, go to the "Text Effects" pick (modest "A" shown as point 2 in the image above). Click on the pointer and open the dropdown.
Then, choose "Transform", and under the "Follow Path", choose "Circumvolve" as indicated in the epitome above.
Step iii – Brand the Text Box Square in Shape
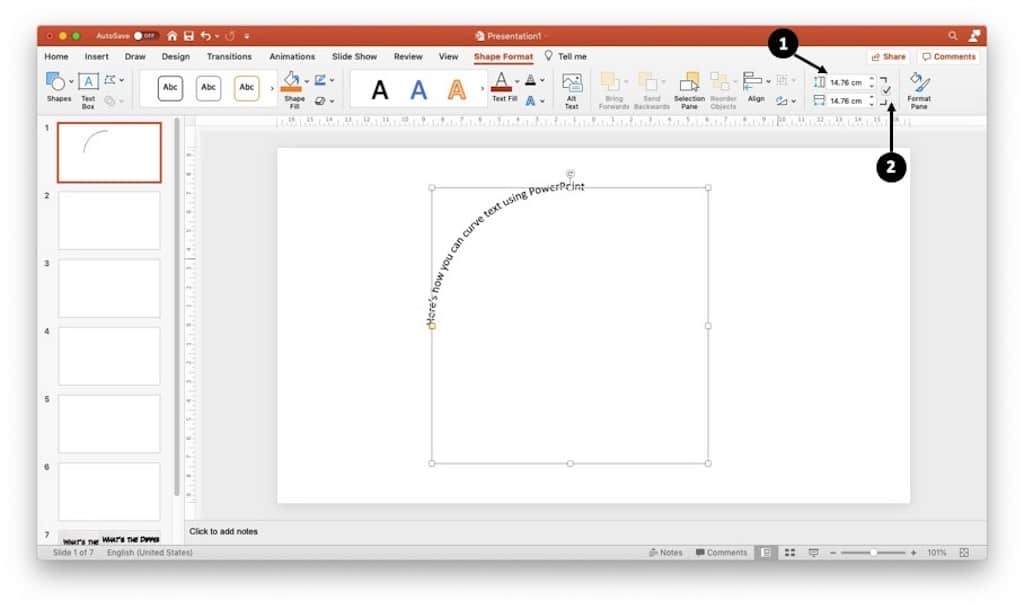
When you transform the text every bit circle, you will notice that the text doesn't really look like a circumvolve!
That'due south considering we need to modify the size of the text box. To exercise then, on the shape format tab, increase the elevation of the text box to match that of the width. Yous tin besides decrease the width to friction match the acme, but that will just brand your text box smaller.
One time, you have made the height and width the same, brand sure you lock the aspect ratio past clicking on the check box next to the dimensions box equally indicated in the epitome higher up.
Step iv – Increment the Font Size
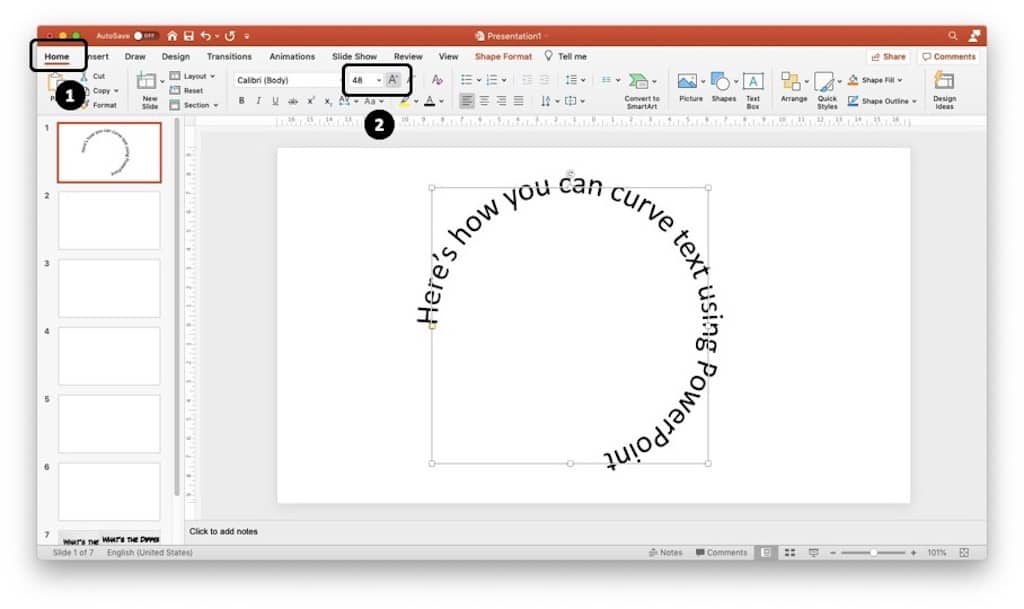
Despite completing the Step iii above, you may notice that your text is still not in a circular shape. So, we now need to adapt the size of the fonts. Information technology is also the perfect fourth dimension to alter the font as per your preference.
To increase the font size, get to the "Home" tab, and and so increase the "Font Size" every bit indicated in the paradigm higher up.
For the sample text that I've used, font size lx seemed perfect for me (as indicated in the next image in step five).
Step 5 – Rotate the Text Box past 90 Degrees

As you tin see in the prototype, I settled at font size 60.
But, hither's a problem – I want the sentence to start right at the acme instead of starting from the left side. To exercise so, just rotate the text box by 90 degrees past clicking on the rotate button on the text box, and moving it to the correct past 90 degrees.
Footstep 6 – Copy the Text Box
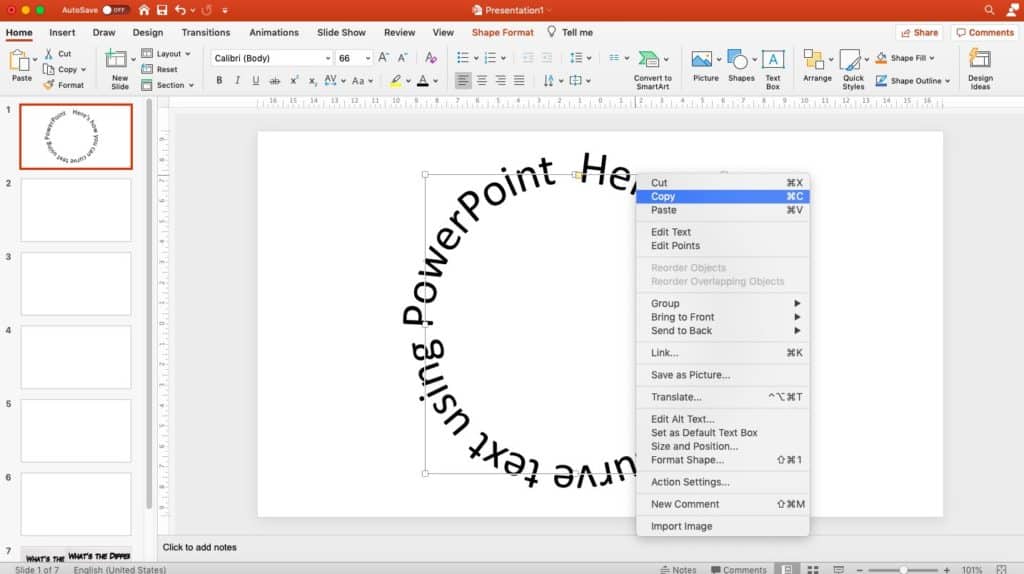
Now that you lot take your desired text curved into a round shape, information technology is fourth dimension that we movement it to the Google Slides.
To do so, commencement, nosotros need to re-create the text box. Right-click on the text box, and select copy or copy it directly by pressing Ctrl + C (or Cmd + C on Mac).
Step 7 – Paste the Curved Text Box in Google Slides
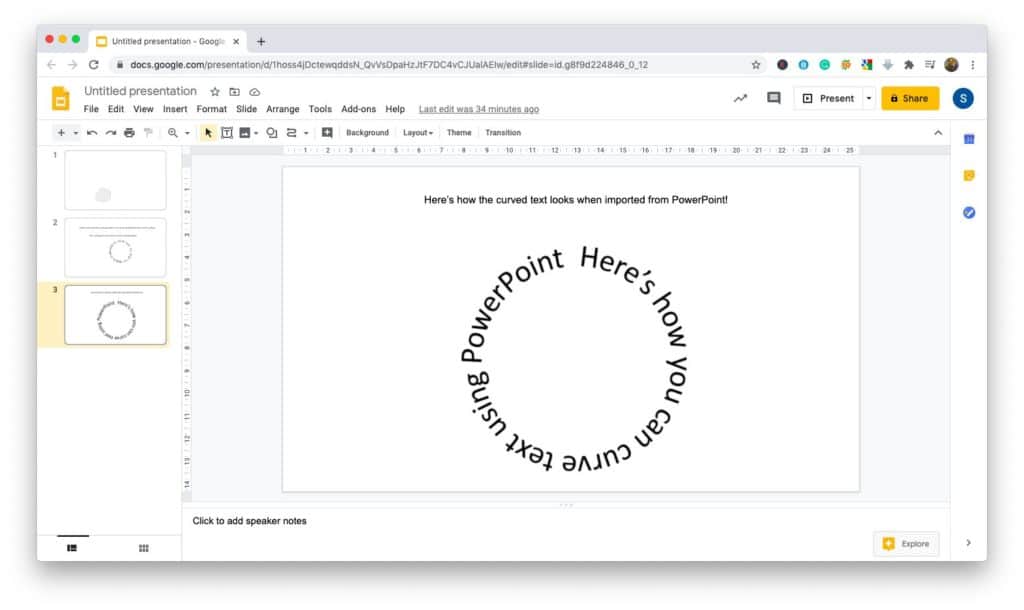
The last step would be to simply paste it in the desired location in your Google Slides Presentation!
Voila! Y'all now have successfully managed to curve text in Google Slides!
Drawbacks of this Method
While you can surely and successfully add bend text to Google Slides using PowerPoint as we described in the steps above, in that location are a few drawbacks to this method. These are as follows –
1. You lot need to take Microsoft PowerPoint for this Method
1 of the drawbacks is that y'all NEED to accept PowerPoint to carry out the steps outlined above. However, the fact is, most people today use Google Slides only because they do non desire to pay for Microsoft PowerPoint!
There may be other reasons for choosing to work on Google Slides or not having a copy of Microsoft PowerPoint.
So, this method may not work for you if y'all prefer to work only on Google Slides and non on PowerPoint.
2. You need to also go on the PowerPoint File Prophylactic
Y'all may have noticed that once you pasted the text box containing the curved text from PowerPoint to Google Slides, the text box is now converted into an image. Pregnant, y'all are now unable to edit the text in Google Slides!
Thus, another drawback to this method is that you also need to salvage the PowerPoint file as long every bit you need the Google Slides presentation for which you just created the curved text.
Add together Curve Text in Google Slides using Online Tools
If y'all don't accept Microsoft PowerPoint or if you lot prefer to not use PowerPoint considering of the drawbacks mention to a higher place, at that place are a few online tools that are available which provide y'all with the functionality to curve text into a circle.
I'm going to provide the best 2 tools that are completely Complimentary to use and are the near convenient to work with –
1. Add together Curve Text in Google Slides using MockoFUN
Then, MockoFUN is a groovy tool to create Curved Text for your Google Slides. It is by far the best tool online that allows y'all to create curved text in various shapes and different types!
You get multiple varieties of styles in which you can actually curve text, and then insert it into Google Slides!
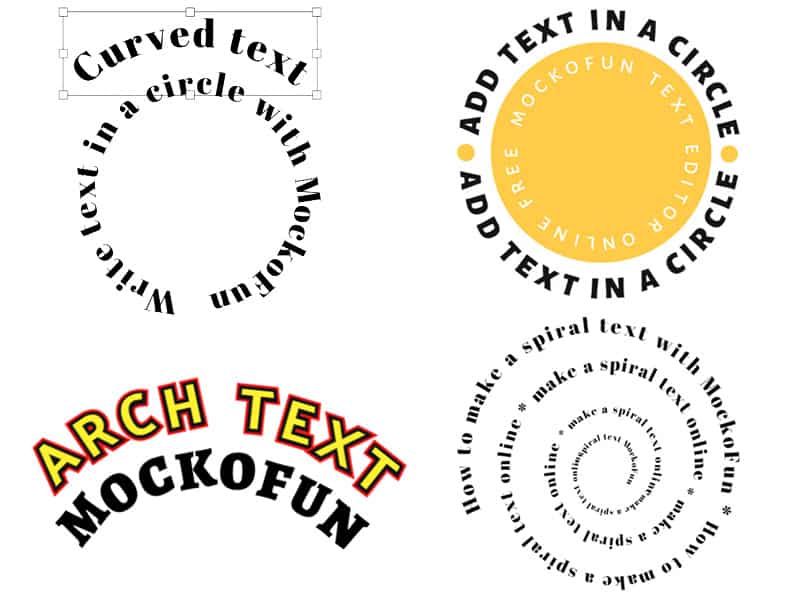
They even have a detailed Tutorial mentioned on their site (click on this link – MockoFUN Tutorial on How to Curve Text). The tutorial goes in-depth explaining the steps in particular.
In one case you're done creating the curved text in the desired manner and fashion, putting it in Google Slides is easy. Simply, right-click on the text and download it. It volition download as a png file. You can then re-create and paste that image directly to Google Slides.
1 downside to this site is that while using MockoFUN is FREE, y'all will need to create an account with them (which is also free). I know some of you may not exist quite comfortable giving personal details or even creating an account with a site that you're perhaps only going to use merely once!
Besides, but as was the instance with the PowerPoint method, yous won't be able to edit the text in Google Slides as this is pasted as an image.
ii. Add Curve Text to Google Slides using TroyGram
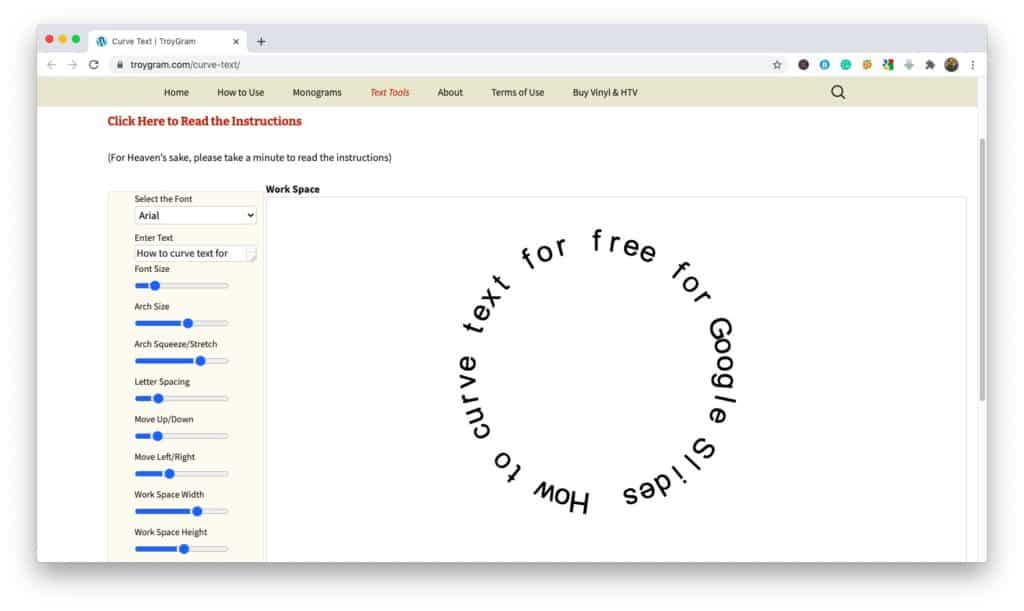
If you are similar me and are not comfortable disclosing personal information while creating an account on a website that maybe you will never utilise again in the hereafter (Hint – MockoFUN), and so TroyGram is the perfect pick for you!
It doesn't have as many features as MockoFUN, but it does become the job done! Besides, I've noticed having too many frills makes me slow down. So, using TroyGram was a quick and easy fashion to brand Curve Text and add together it to my Google Slides.
Using the features on the left are not intuitive at outset. But, by spending few minutes niggling with it, I managed to get it but right.
TroyGram also comes with detailed instructions on how to apply the curved text generator tool on its site. However, information technology is easy to miss out on the instructions especially when y'all are in a hurry! I'll paste the link here for your convenience – TroyGram Instructions
Final Thoughts
If you lot want to curve text into a circular shape in Google Slides, there is no direct method. However, there are a number of tools which can get the job washed!
My favorite method is using PowerPoint every bit it allows u.s. to change the way we take curved text even in the future. However, if PowerPoint is not an option for you, I would recommend using MockoFUN as information technology is the nigh convenient and easy to use amongst other tools bachelor.
I promise this post has been helpful for y'all. If you have whatsoever questions, allow me know in the comments below!
Source: https://artofpresentations.com/curve-text-into-a-circumvolve-in-google-slides/

Source: https://keithbourfere.blogspot.com/2021/11/how-to-curve-words-in-google-drawings.html
Posted by: sandovalventing.blogspot.com
0 Response to "how to curve words in google drawings"
Post a Comment